Category Archives: Help

Interlaced Timeline

Interlaced Timeline

Timeline (Interlaced Mode)


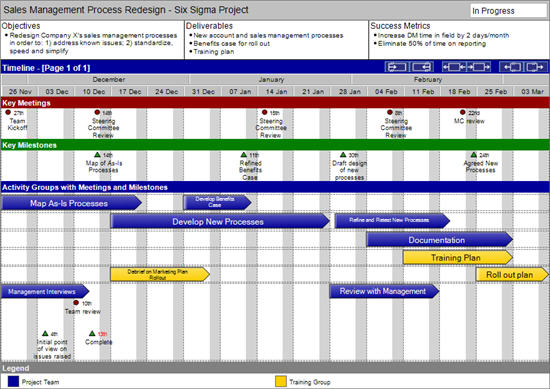
The Timeline Interlaced Mode displays the Timeline with additional content related to each Activity Group, specifically the Activity Groups� Meetings, Milestones, or textboxes with information on the Activity Groups� Objectives, Key Questions, Deliverables, Success Metrics, etc.

This extra information is displayed directly beneath each Activity Group. (Note: All of this content can also be seen in the Activity Group Detail view – the Meetings and Milestones can be seen in the Activity Group Detail Timeline section and the content from the interlaced textboxes can be seen in the Activity Group Detail Header section).

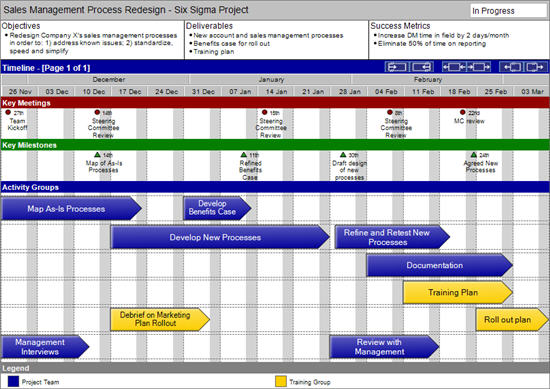
Example of a timeline interlaced with Activity Group Meetings and Milestones


Example of a timeline interlaced with Activity Group Deliverables


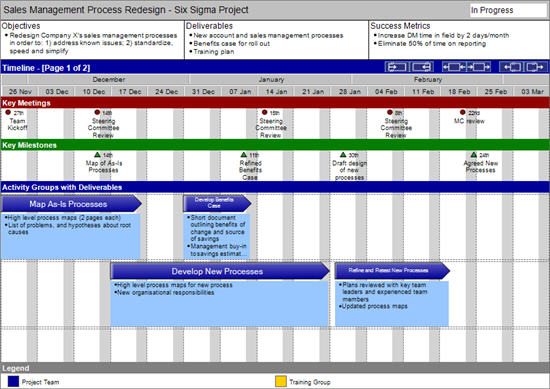
Because the Timeline in Interlaced mode has this additional content (and because it will try to keep all information related to one Activity Group together on the same page) it is far more likely that the Timeline view will have to be displayed over more two or more pages. Thus when you move to Timeline Interlaced mode from Timeline Standard mode you may see the height of the Activity Group arrows change or see Activity Groups move around between pages.


The Timeline has two main modes of display "Standard" and "Interlaced". In addition, there is a "Review" mode that can be seen in conjunction with both standard mode and interlaced mode. The text below specifically applies to the Interlaced mode.

Click here for more information about Timeline Standard mode

Click here for more information about Timeline Review mode

Click here for information on how to customise the colours on your timeline using the Customise Colours tab in the Tools Options menu.


Changing the Content that is Being Interlaced

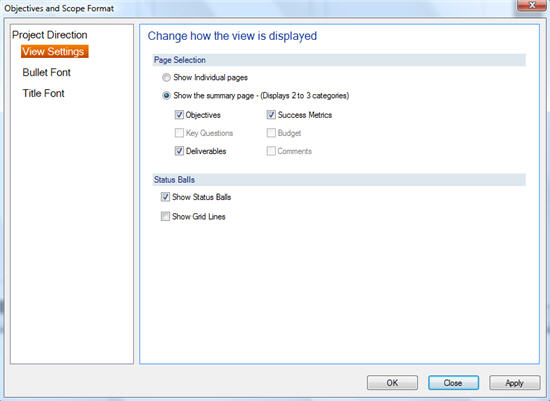
You can change the content that is being displayed with the Activity Groups by using the Timeline (Interlaced mode) button on the toolbar or the Go To menu. Alternatively you can use the the Page Body Format dialogue on the Display Mode tab.


Moving Interlaced Meetings and Milestones Between Activity Groups

Interlaced Meetings and Milestones can be moved by dragging and dropping them in exactly the same way as other items on the Timeline view. This is described in the Timeline (Standard mode). However, in Interlaced mode, Meetings and Milestones can also be moved between Activity Groups.

When setting or moving the position of an Interlaced Meeting or Milestone it is possible to place it in a somewhat ambiguous position if there is more one Activity Group on a particular row and if the Meeting or Milestone is positioned outside the date range of the Activity Group it is associated with. The following rules apply in these circumstances:

  • When moving an Interlaced Meeting or Milestone within the same Activity Group row, it will always remain associated with its original Activity Group unless it is specifically placed on top of a different Activity Group arrow
  • When moving an Interlaced Meeting or Milestone out of the original Activity Group row, the association will change to the Activity Group in that row. If there are multiple Activity Groups in the new row then Swiftlight will ask the user to specify which Activity Group unless the Meeting or Milestone is specifically placed on top of a different Activity Group arrow


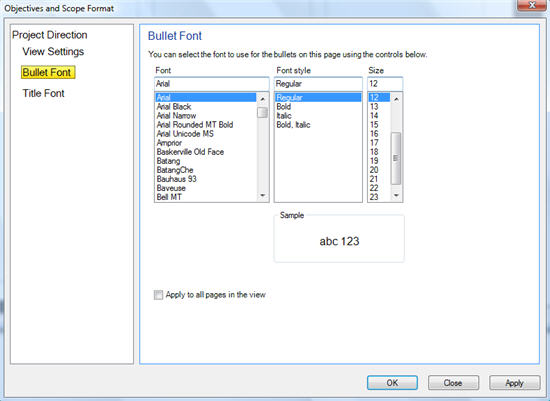
Adding Bullets to Interlaced Textboxes

To add text just click in the required section and hit return to add a new bullet


Re-order Interlaced Bullets

Bullets can be moved up and down using the sorting toolbar arrows or from the Page Layout menu (Shortcuts are also available). The bullets can also be indented using the toolbar or shortcuts


For information on the following functionality of the Timeline (Interlaced mode) please see the detailed description of the Timeline (Standard mode).

Changing the Time Range of the Timeline view

Adding Activity Groups, Meetings and Milestones

Changing the Dates of Activity Groups, Meetings and Milestones

Editing Other Details of Activity Groups, Meetings and Milestones

Adding and Deleting Rows for Activity Groups


Other Settings

There are many other settings that control the content, appearance and constraints of the Timeline view. These can be accessed through the Page Body Format dialogue, or for colour customisation, through the Tools Options menu.


Timeline

Timeline

Timeline


The Timeline is an intuitive and highly configurable view that allows you to set out or review high level project plans and get a "big picture view" of what needs to get done.

The timeline is a "one page wide" window on your plan. The time span shown can be expanded / contracted to allow you to look at the time period you want. It can be one or many pages high depending on the size of / detail in your plan, though most simple plans can fit easily on one page.


Laying out a Timeline in this view is very quick and easy. The Dynamic Formatting Algorithm helps auto-fit the content to the page so that you can concentrate on what is in the plan without having to worry about formatting it. If Swiftlight sees that items will be overlapping in the Timeline view, the program automatically formats the content to optimise its display (within certain constraints).

The Timeline has two main modes of display "Standard" and "Interlaced". In addition, there is a "Review" mode that can be seen in conjunction with both standard mode and interlaced mode. The text below specifically applies to the standard mode but many of the functionalities are available in the other modes.

Click here for more information about Timeline Interlaced mode

Click here for more information about Timeline Review mode

Click here for information on how to customise the colours on your timeline using the Customise Colours tab in the Tools Options menu.


Changing the Time Range of the Timeline view

When you first open Swiftlight you will start with the Timeline view showing 8 weeks from the current date. This time range is not the length of the project but rather the width of the "window" looking on to the project. You can zoom into a particular part of your project or view the whole scope of your work by selecting a long date range. As such items in your project can exist outside the currently displayed date range of the Timeline.

You can expand or contract the time period displayed to the required length by using the buttons on the blue Timeline label row above the main body of the page.

The right-most two buttons increase the date range (to the left and to the right). The left-most two icons reduce the date range (to the left and to the right). The middle two icons shift the window left or right i.e keep the same width but moves the displayed time forward or backwards in time.

The amount by which the buttons move the date range depends on the current width of the date range. As the current date range gets larger, the amount the buttons increase, decrease or move the date range also increases. For example, with a current date range of 8 weeks, the right-most button will increase the end of the date range by one week so that 9 weeks are now shown; however if the current date range is 6 months, the same button would now increase the date range by one month.

Alternatively you can use the Page Body Format dialogue to direct select the start and end dates of the date range of the Timeline.


Adding Activity Groups, Meetings and Milestones

There are a number of ways of adding new Meetings, Milestones and Actions into the Timeline:

  • Dragging and dropping the respective icons from the Toolbox section into the Timeline
  • Double-clicking on the respective icons from the Toolbox section and then clicking on the place you would like the selected item
  • The menu (Insert > Activity Group OR Meeting OR Milestone) then clicking on the place you would like the selected item
  • Right-clicking where you would like the Activity Group, Meeting or Milestone and selecting Insert > Activity Group OR Meeting OR Milestone from the menu that has appeared

If you add a new Meeting or Milestone on top of a Activity Group then the new item will be placed into that Activity Group and the Timeline will move into Interlaced mode with the new item visible below its Activity Group.


Changing the Dates of Activity Groups, Meetings and Milestones

Activity Groups can be picked up and dragged to a new position on the Timeline, thereby changing both the start and end dates. The Activity Group can be "picked up" when the cursor changes from being the usual pointer arrow to a four-way pointing arrow, which occurs when the cursor is above the top, botton or ends of the Activity Group arrow.

When you drag an Activity Group to a new date position, you will asked whether you want to move all of the "non-completed" associated Meetings, Milestones and Actions by the same amount. You will be given an option to always say yes to this question for subsequent moves of other Activity Groups.

Alternatively you can alter the position of each end of the Activity Group independently to stretch or contract the length of an Activity Group. The length of Activity Groups can be changed by grabbing the ends of the arrows and dragging them to the required length. You can tell that you are able to grab the end of an Activity Group arrow when the mouse cursor turns into a line with an small arrow pointing away from the Activity Group.

Similarly the dates of Meetings and Milestones can be changed by dragging and dropping them to a new position (date) on the Timeline. Alternatively a left-click on the date indicator to the right of the Meeting or Milestone icon will bring up a date selector. The right-click menu also gives you a option to move the Meeting or Milestone using a Change Date… dialogue and selecting the required date.

You can move the position of multiple items at the same time by first selecting the required items and then performing the move (or stretch for Activity Groups) to one of the selected items. Multiple items can be selected by holding down the SHIFT key whilst selecting each item or you can select all the item in a region by moving the pointer whilst holding down the left-click mouse button (this method is often called drag-select).


Editing Other Details of Activity Groups, Meetings and Milestones

The description text of any Activity Group, Meeting or Milestone cna be changed by clicking on the existing text and editing it.

The colour of Activiy Group arrows can be changed in two ways. Whilst an Activity Group arrow is selected, left-clicking on the required colour in the legend will change the colour. Using the right-click menu will also allow you change the colour. Multiple arrows can be coloured together in the same way as described above to move the position of multiple items.

Individual Activity Groups, Meetings or Milestones can be hidden from the Timeline view so that you can control what you display on this important output. The hidden items will be displayed in other views (unless hidden there too). There are several ways to hide and unhide items but each work in the same way:

  • Toolbar Hide and Unhide buttons
  • Menu Edit > Hide and Edit > Unhide
  • With right-click menu options

If you double-click on any Activity Group, Meeting or Milestone, you will be taken to the Activity Group Detail view and into the Activity Group for that item. All other details can be edited in the Activity Group Detail view.


Adding and Deleting Rows for Activity Groups

When you first open Swiftlight you will start with the Timeline view showing six Activity Group Rows available to place your Activity Groups into.

If you decide you need more (or fewer) rows for Activity Groups than the six that are there as the default, then you can use the right-click menu to add or delete rows at the point you right click. Alternatively, you can use the Page Body Format dialogue, select the Activity Group Rows tab, and set the number of rows for the first page and for the Timeline overall.

If when you add a new Activity Group, the Activity Group Rows are already full, a new Activity Group row will be added automatically for you. You will be asked whether you want the Activity Group Rows to shrink so that they all still fit on the one page or whether you would like the bottom row to spill on to the next page.


Other Settings

There are many other settings that control the content, appearance and constraints of the Timeline view. These can be accessed through the Page Body Format dialogue, or for colour customisation, through the Tools Options menu.


Page Format Dialogue

Page Format Dialogue

Objectives and Scope Page Format Dialogue


The Objectives and Scope page format dialogue allows you to format and configure the Objectives and Scope view to display the content you want to show.

The controls are logically grouped together into various tabs.


View Settings Tab

Bullet Font Tab

Title Fonts Tab

Objectives and Scope

Objectives and Scope

Objectives and Scope


This view provides a series of pages in which to display information related to the project�s scope.


Seven categories of information are displayed over the pages of the Objectives and Scope view:

  • Objectives;
  • Key Questions (i.e. questions or issues the project needs to address);
  • Deliverables;
  • Success Metrics;
  • Budget;
  • Scope In / Scope Out;
  • Comments


Add new Bullet

You can add a new bullet by simply clicking in the section you require and typing the text you require. Hitting return (Enter) gives you another bullet below the current one.


Re-order bullets

Bullets can be moved up and down using the sorting toolbar arrows or from the Page Layout menu (Shortcuts are also available). Also using the tooolbar, the level of indent for the Bullets can also be changed.


Format bullets

Each of the bullets can be formatted using the Page Body format dialogue to change:

  • Font type
  • Font style (bold, italics, underline)
  • Font colour


Progress Balls

Progress against each of the bullets can be indicated by switching on the Progress Balls and clicking on each ball to cycle through the 5 states from empty to full. Progress balls are on by default – they can be de-selected using the Page Body format dialogue


Changing which content appears on the First (Summary) Page of the Objectives and Scope view

The way that the content for the Objectives and Scope view is laid out can be changed using the Page Body format dialogue.


Page Header

Page Header

Page Header


The Page Header is the top section of the page in each view. In the Page Header you can create, display, or edit the project title, its status and performance, and high level information from the Objectives and Scope view about the project objectives, deliverables, success metrics et al. This allows you to have visible, and in mind, high level information about the project’s goals when you are working on other parts of the plan.


When you open Swiftlight the project title "New Project" will be highlighted ready to be replaced with your own project name. To the right of this are two dropdowns where you can edit the status (Not Started, In Progress or Complete) and the performance which is indicated with “traffic light” coloured icons.

In the second row , you can display text boxes with the following categories of information from the Objectives and Scope view: Objectives, Key Questions, Deliverables, Success Metrics, Budget, Comments. (Note: you can choose to display some, all or none of these categories using the header dialogue. In the example above, the three default selections are shown). You can create or edit the information in these text boxes simply by clicking on them and typing.

In the second row, you can also display “progress balls” for each bullet point which can indicate the status or progress against each item. In the example above, the objectives text box has a fully filled progress ball for one bullet (indicating it is complete), and a half-filled ball for the second (indicating it is 50% done). To change the fill of a progress ball (from empty to 25%, 50%, 75% then 100%) simply select it, and then click on it.

Both the title row and the second row can be displayed in all views except the Activity Group Detail view, in which only the title row is displayed for reasons of space, and the Objectives and Scope view in which only the title row is displayed since the other information is on the main pages in that view.

To control the amount of space in this top section, you can expand (or shrink) it by grabbing (clicking and dragging) the splitter bar (1) just on top of the blue label row and moving it up or down as required. The Page Header can take from a few percent up to 25% of the page height.


Choosing what to Display

To select how you would like the content of the Page Header to be displayed, you must open the Page Header dialogue. This can be done by either clicking on the top arrow icon to the left of the view, or selecting from the menus Page Layout > Page Header. The dialogue below will open up:


Title Row: use the tick boxes to select whether to display the status and performance sections. The Project Title is always displayed.

Second Row: use the tick boxes to select which, if any, categories of information to display and whether to display the Progress Balls.

When you are happy with your selections, if you click on the “Apply” button, your selections will apply just to the view you are in. If you click on the “Apply to All” button, your selections will apply to all the views in which the Page Header is displayed.


Format bullets

Each of the bullets can be formatted using the formatting toolbar or the Format Bullet Text dialogue to change:

  • Font type
  • Font style (bold, italics, underline)
  • Font colour
  • Indent level of the bullet

Formatting changes can be made for each bullet, or applied to all bullets in the same category by using the "Apply to All Button"

Note: bullets that are indented are not shown in the Page Header section which is essentially a summary view of the Objective and Scope content. They can be viewed by going to the Objectives and Scope view


Progress balls

Progress against each of the bullets can be indicated by switching on the Progress Balls and clicking on each ball to cycle through the 5 states from empty to full.