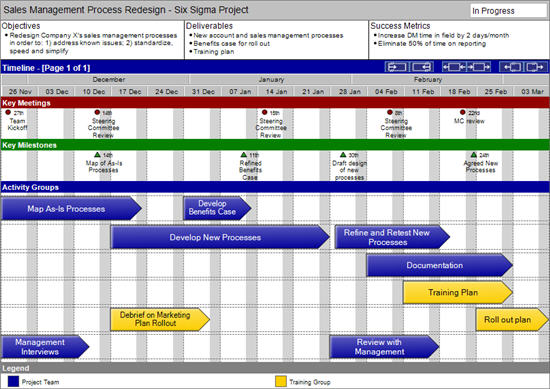
The Timeline is an intuitive and highly configurable view that allows you to set out or review high level project plans and get a "big picture view" of what needs to get done.
The timeline is a "one page wide" window on your plan. The time span shown can be expanded / contracted to allow you to look at the time period you want. It can be one or many pages high depending on the size of / detail in your plan, though most simple plans can fit easily on one page.
Laying out a Timeline in this view is very quick and easy. The Dynamic Formatting Algorithm helps auto-fit the content to the page so that you can concentrate on what is in the plan without having to worry about formatting it. If Swiftlight sees that items will be overlapping in the Timeline view, the program automatically formats the content to optimise its display (within certain constraints).
The Timeline has two main modes of display "Standard" and "Interlaced". In addition, there is a "Review" mode that can be seen in conjunction with both standard mode and interlaced mode. The text below specifically applies to the standard mode but many of the functionalities are available in the other modes.
Click here for more information about Timeline Interlaced mode
Click here for more information about Timeline Review mode
Click here for information on how to customise the colours on your timeline using the Customise Colours tab in the Tools Options menu.
When you first open Swiftlight you will start with the Timeline view showing 8 weeks from the current date. This time range is not the length of the project but rather the width of the "window" looking on to the project. You can zoom into a particular part of your project or view the whole scope of your work by selecting a long date range. As such items in your project can exist outside the currently displayed date range of the Timeline.
You can expand or contract the time period displayed to the required length by using the buttons on the blue Timeline label row above the main body of the page.
The right-most two buttons increase the date range (to the left and to the right). The left-most two icons reduce the date range (to the left and to the right). The middle two icons shift the window left or right i.e keep the same width but moves the displayed time forward or backwards in time.
The amount by which the buttons move the date range depends on the current width of the date range. As the current date range gets larger, the amount the buttons increase, decrease or move the date range also increases. For example, with a current date range of 8 weeks, the right-most button will increase the end of the date range by one week so that 9 weeks are now shown; however if the current date range is 6 months, the same button would now increase the date range by one month.
Alternatively you can use the Page Body Format dialogue to direct select the start and end dates of the date range of the Timeline.
There are a number of ways of adding new Meetings, Milestones and Actions into the Timeline:
If you add a new Meeting or Milestone on top of a Activity Group then the new item will be placed into that Activity Group and the Timeline will move into Interlaced mode with the new item visible below its Activity Group.
Activity Groups can be picked up and dragged to a new position on the Timeline, thereby changing both the start and end dates. The Activity Group can be "picked up" when the cursor changes from being the usual pointer arrow to a four-way pointing arrow, which occurs when the cursor is above the top, botton or ends of the Activity Group arrow.
When you drag an Activity Group to a new date position, you will asked whether you want to move all of the "non-completed" associated Meetings, Milestones and Actions by the same amount. You will be given an option to always say yes to this question for subsequent moves of other Activity Groups.
Alternatively you can alter the position of each end of the Activity Group independently to stretch or contract the length of an Activity Group. The length of Activity Groups can be changed by grabbing the ends of the arrows and dragging them to the required length. You can tell that you are able to grab the end of an Activity Group arrow when the mouse cursor turns into a line with an small arrow pointing away from the Activity Group.
Similarly the dates of Meetings and Milestones can be changed by dragging and dropping them to a new position (date) on the Timeline. Alternatively a left-click on the date indicator to the right of the Meeting or Milestone icon will bring up a date selector. The right-click menu also gives you a option to move the Meeting or Milestone using a Change Date… dialogue and selecting the required date.
You can move the position of multiple items at the same time by first selecting the required items and then performing the move (or stretch for Activity Groups) to one of the selected items. Multiple items can be selected by holding down the SHIFT key whilst selecting each item or you can select all the item in a region by moving the pointer whilst holding down the left-click mouse button (this method is often called drag-select).
The description text of any Activity Group, Meeting or Milestone cna be changed by clicking on the existing text and editing it.
The colour of Activiy Group arrows can be changed in two ways. Whilst an Activity Group arrow is selected, left-clicking on the required colour in the legend will change the colour. Using the right-click menu will also allow you change the colour. Multiple arrows can be coloured together in the same way as described above to move the position of multiple items.
Individual Activity Groups, Meetings or Milestones can be hidden from the Timeline view so that you can control what you display on this important output. The hidden items will be displayed in other views (unless hidden there too). There are several ways to hide and unhide items but each work in the same way:
If you double-click on any Activity Group, Meeting or Milestone, you will be taken to the Activity Group Detail view and into the Activity Group for that item. All other details can be edited in the Activity Group Detail view.
When you first open Swiftlight you will start with the Timeline view showing six Activity Group Rows available to place your Activity Groups into.
If you decide you need more (or fewer) rows for Activity Groups than the six that are there as the default, then you can use the right-click menu to add or delete rows at the point you right click. Alternatively, you can use the Page Body Format dialogue, select the Activity Group Rows tab, and set the number of rows for the first page and for the Timeline overall.
If when you add a new Activity Group, the Activity Group Rows are already full, a new Activity Group row will be added automatically for you. You will be asked whether you want the Activity Group Rows to shrink so that they all still fit on the one page or whether you would like the bottom row to spill on to the next page.
There are many other settings that control the content, appearance and constraints of the Timeline view. These can be accessed through the Page Body Format dialogue, or for colour customisation, through the Tools Options menu.