The Page Header is the top section of the page in each view. In the Page Header you can create, display, or edit the project title, its status and performance, and high level information from the Objectives and Scope view about the project objectives, deliverables, success metrics et al. This allows you to have visible, and in mind, high level information about the project’s goals when you are working on other parts of the plan.

When you open Swiftlight the project title "New Project" will be highlighted ready to be replaced with your own project name. To the right of this are two dropdowns where you can edit the status (Not Started, In Progress or Complete) and the performance which is indicated with “traffic light” coloured icons.
In the second row , you can display text boxes with the following categories of information from the Objectives and Scope view: Objectives, Key Questions, Deliverables, Success Metrics, Budget, Comments. (Note: you can choose to display some, all or none of these categories using the header dialogue. In the example above, the three default selections are shown). You can create or edit the information in these text boxes simply by clicking on them and typing.
In the second row, you can also display “progress balls” for each bullet point which can indicate the status or progress against each item. In the example above, the objectives text box has a fully filled progress ball for one bullet (indicating it is complete), and a half-filled ball for the second (indicating it is 50% done). To change the fill of a progress ball (from empty to 25%, 50%, 75% then 100%) simply select it, and then click on it.
Both the title row and the second row can be displayed in all views except the Activity Group Detail view, in which only the title row is displayed for reasons of space, and the Objectives and Scope view in which only the title row is displayed since the other information is on the main pages in that view.
To control the amount of space in this top section, you can expand (or shrink) it by grabbing (clicking and dragging) the splitter bar (1) just on top of the blue label row and moving it up or down as required. The Page Header can take from a few percent up to 25% of the page height.

To select how you would like the content of the Page Header to be displayed, you must open the Page Header dialogue. This can be done by either clicking on the top arrow icon to the left of the view, or selecting from the menus Page Layout > Page Header. The dialogue below will open up:
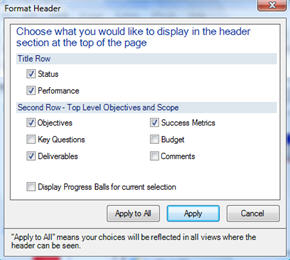
Title Row: use the tick boxes to select whether to display the status and performance sections. The Project Title is always displayed.
Second Row: use the tick boxes to select which, if any, categories of information to display and whether to display the Progress Balls.
When you are happy with your selections, if you click on the “Apply” button, your selections will apply just to the view you are in. If you click on the “Apply to All” button, your selections will apply to all the views in which the Page Header is displayed.
Each of the bullets can be formatted using the formatting toolbar or the Format Bullet Text dialogue to change:
Formatting changes can be made for each bullet, or applied to all bullets in the same category by using the "Apply to All Button"
Note: bullets that are indented are not shown in the Page Header section which is essentially a summary view of the Objective and Scope content. They can be viewed by going to the Objectives and Scope view
Progress against each of the bullets can be indicated by switching on the Progress Balls and clicking on each ball to cycle through the 5 states from empty to full.