Category Archives: Help

Swiftlight in the project lifecycle

Swiftlight in the project lifecycle

Swiftlight in the Project Lifecycle


Swiftlight specifically supports and facilitates all stages of a project’s lifecycle, with views / outputs that are well suited to different stages of a project and to different occasions / audiences.

Furthermore, Swiftlight supports the communication that is so central to a project’s success, through providing high quality graphics and clear structure that focuses people on the fundamentals.

The graphic below illustrates the use of Swiftlight through the project lifecycle:


Examples of the views shown in this graphic are given below under the following four sections:

  • Project Initiation and Planning / Re-planning
  • Implementation
  • Managing, Reviewing and Reporting
  • Project Close


Project Initiation and Planning / Re-planning

Implementation

Managing, Reviewing and Reporting

Project Close


For more detail about using Swiftlight in the Project Lifecycle:


Review and reporting

Review and reporting

Review and Reporting


While all of the views in Swiftlight can be used to review and report progress, there are three views / areas of functionality that are particularly worth highlighting.

The in-built status reporting functionality, which provides a standard template for regular reporting on overall progress and on the progress of specific Activity Groups and Milestones. These reports are automatically populated to make reporting an easy and painless experience that links all updated information back into the plan. Click here for more information about Status Reports.

The Timeline view in review mode, which shows the position of Activity Groups and Milestones relative to the project baseline. Click here for more information about Timeline (Review mode).

The Activity Group Summary, which can be formatted to highlight activity status and performance and thereby facilitate the communication and discussion of progress for each Activity Group. Click here for more information about the Activity Group Summary view.

Examples of each follow below:


Your exact review and reporting needs will determine which of the above views will be most helpful. The Activity Group Detail, Action List and Action List over Time views can also be very effective for reporting progress at the more detailed activity by activity level.

More ways to use Swiftlight in the Project Lifecycle:


Detailed action and planning

Detailed action and planning

Detailed Action Planning and Implementation


So you have a high level plan – now what? With the overall direction clear, one of the next steps is to mobilise the team to get things done.

While many projects don’t need a whole lot more detail than the immediate next steps, in many other cases breaking down the big activities into discreet, do-able tasks and laying out the detail of “who has to do what by when” is an important part of ensuring the plan is robust and achievable.

When there is a need to develop a plan with this detail, it is often the case that the immediate next steps (perhaps the next few weeks) are pretty clear but that the details further out in the plan are more uncertain. As a result, it can often make sense to plan the short term in detail and leave the longer term plan much higher level, filling in these longer term details as the project moves forward and the required steps become clearer.

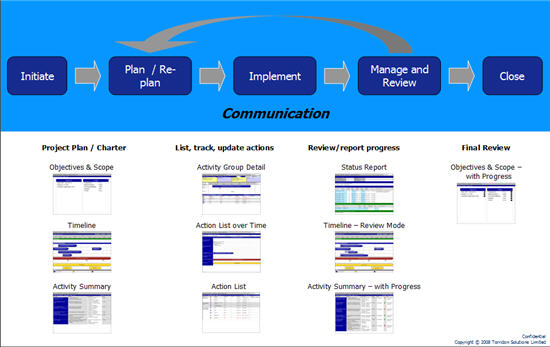
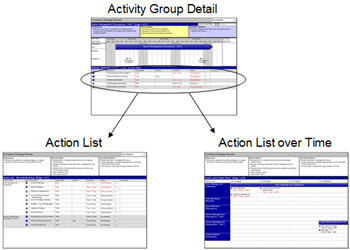
Swiftlight has been designed to make this detailed action planning, and the continual updating and refinement of the plan, as quick and straightforward as possible. This detailed action planning and the updates that occur during the implementation can easily be done in the "lower level" views in Swiftlight: the Activity Group Detail, the Action List or the Action List over Time.

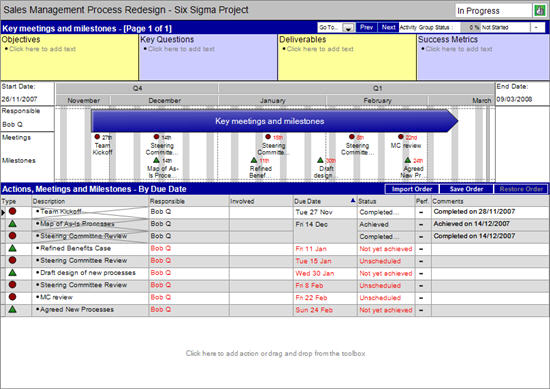
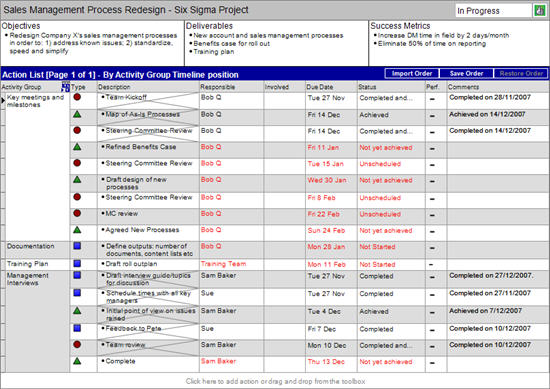
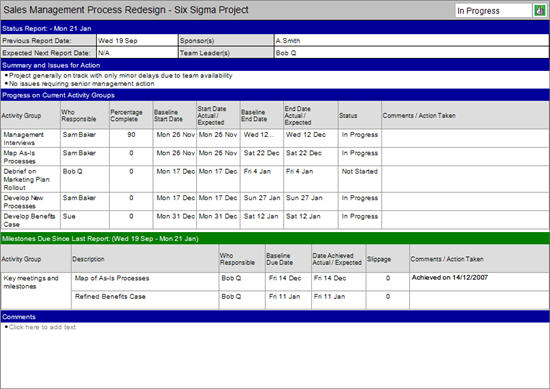
The bottom section of the Activity Group Detail view contains a "to do list" – who has to do what by when, the status of these tasks etc. This list is replicated in a different form in the Action List and Action List over Time, as illustrated below, so you have different views for different types of projects and occasions (see Getting Familiar with Each View for more details).


How to get started?

When doing the initial detailed action planning (and presuming you already have a high level timeline developed) we suggest the following:

  1. Go to the contacts view and, if you have not already done so, list the people / groups / suppliers ("Contacts") who may be involved in the project. All the contacts can be assigned responsibility for Activity Groups or individual meetings, milestones or actions, and while you can set up new Contacts as you go, it is a bit easier if you have set up most of them before you get started.
  2. Use the Activity Group Detail view and work through activity by activity to list all the tasks or the immediate next steps, assign responsibilities and define due dates.
    (Note: if this doesn’t suit your working style, you can use the Action List over Time, or the Action List as an alternative).
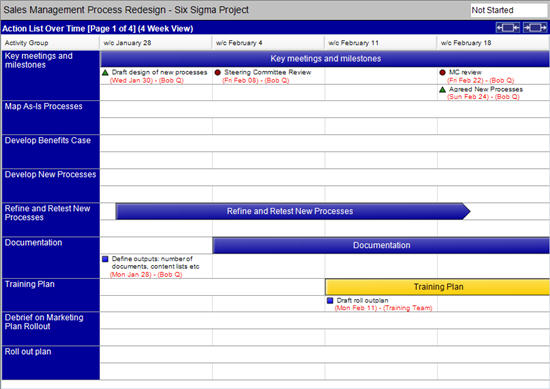
  3. Look at the Action List over Time to see how all the items you have added fit together, and refine your plan accordingly. Particularly when there is a fair amount of detail in the plan for the next 3-4 weeks and less further out
    in time, the Action List over Time is a good view for looking at and refining the plan, or for working with the team to focus people on what needs to get done.

You may find that you are more comfortable working with one view rather than another – which is of course fine, as there is no real right or wrong way to use Swiftlight. Our goal has been to provide a tool with a structure which can suit different working styles and which can be adapted to different situations. So, feel free to experiment with different approaches and find the way that works best for you.


What happens when things change? Keeping the plan up-to-date.

If there is one thing that seems to be common to all projects – it is that the plan changes. Maybe it’s after a month, a week, or a day, maybe new activities need to get added or old activities deleted, or maybe its simply that things start running behind (or even ahead!) of schedule.

Whatever the cause, sooner or later things are likely to change and the plan you put together at the start of the project will be out of date. Even when the plan does not change, the status of actions and activities should be updated so that you have a sense of progress and know where you stand.

Traditionally, updating plans has be really painful, but this is another occasion where the unique “two-level” structure of Swiftlight is a big help and you’ll find that updating and adapting your plan can be quick and easy. For example:

High level changes:

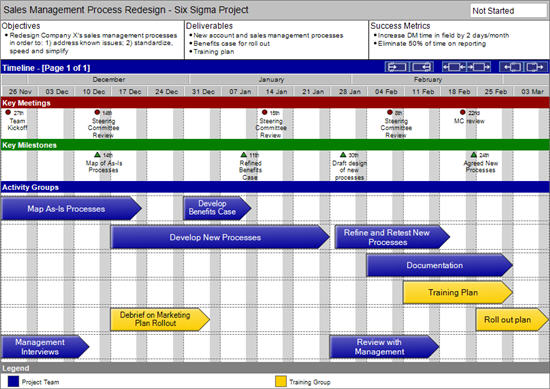
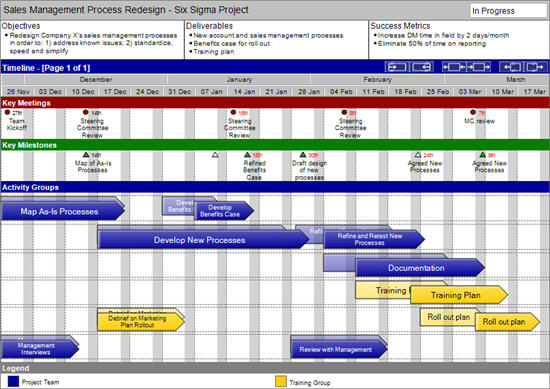
  • In the Timeline view you can:
    • Add or remove time from the project length;
    • Select and move, stretch or shorten the length of Activity Groups
      Note: if you move the Activity Groups, any uncompleted meetings, milestones or actions that are part of it will move by the same amount; but stretching or shortening activity groups does not move them.
    • Add new activity groups or delete activity groups and re-arrange the timeline as required.
    • Merge activity groups
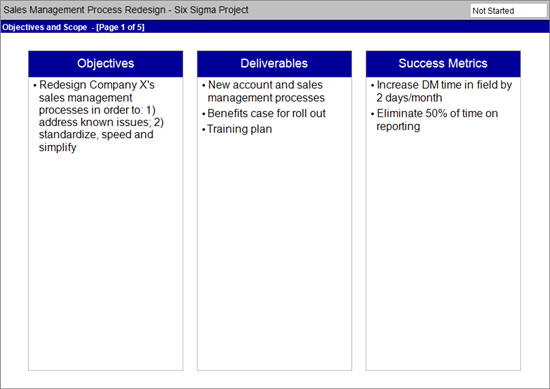
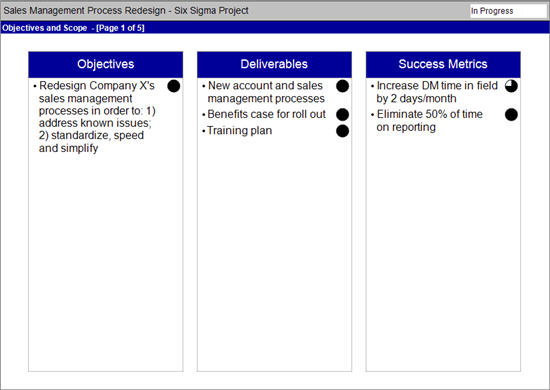
  • In the Objectives and Scope view you can:
    • Update and refine the project objectives, deliverables, success metrics etc.
    • Comment on changes in scope in the Scope In / Out page
    • Highlight progress using the Status Balls
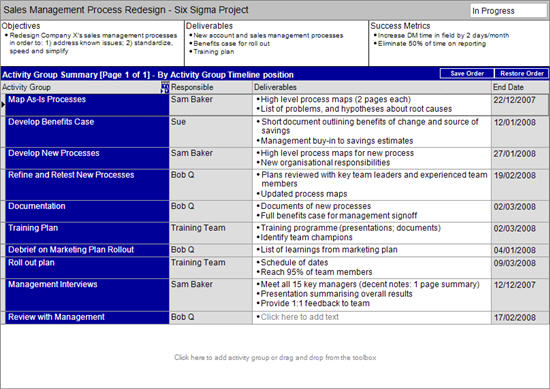
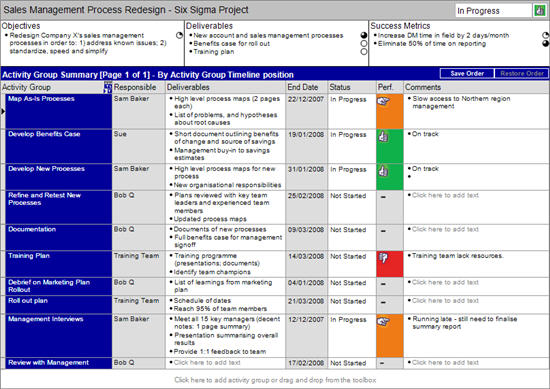
  • In the Activity Group Summary you can:
    • Review and update the objectives, deliverables, success metrics and status of individual activities.
    • Comment on the progress or status of individual activities

Detail changes:

  • In the Activity Group Detail or Action List you can work through each Activity Group to:
    • Review and update the status of individual meetings, milestones or actions;
    • Add new or delete old meetings, milestones or actions
    • Re-assign responsibilities
  • The Action List over Time let’s you see the meetings, milestones and actions across all activities and it is a great view for making changes to the status or timing of individual items, or for adding new items to the plan.
    • Completed items can easily be "crossed out" using the shortcut Ctrl+ENTER.
    • Items can be moved to another time simply by picking them up and dragging them into another week / day.
    • New items can be created by drag and drop from the toolbox.

You will still need to be somewhat disciplined to keep your plan up to date, but the separation of the big-picture from the detail in Swiftlight should make it much easier for you since you won’t get trapped in the detail when making high level changes to the plan, and vice versa.


Working with the team

Swiftlight is a great tool for working with teams. The clear structure and high quality outputs make it easy to plan by yourself or with the team, to communicate these plans and to review and report team progress.

From an operational perspective, you can either develop and maintain a project masterplan yourself, or delegate sections of it to team members. If you are delegating sections of the plan to team members, it is best if you delegate complete Activity Groups as these can be integrated back into a masterplan more easily. For example:

  • If a team member has responsibility for working up the detail of one or more Activity Groups, they should work these up on their own and then send you the Swiftlight file
  • Open your masterplan in Swiftlight, then start another instance of Swiftlight (e.g. by double clicking on the Swiftlight icon on your desktop) and open their file (i.e. you now have two Swiftlight windows open).
  • Go to the timeline view in their file, select and copy the relevant activity groups.
  • Go back to the timeline view in your masterplan and then paste. The relevant activity groups will paste into your timeline along with all the details as supplied by your team member: dates, responsibilities, actions, meetings milestones etc.
    Note: this may cause duplication of contacts since the application does not know whether a contact in one file is the same as a contact in the other. You can remove duplication by going to the Contacts view, deleting the duplicate contacts and automatically re-assigning responsibilities.

Some of the views are particularly effective for working with team members.

  • The Activity Group Detail is a good view for focusing on specific activities and understanding where things stand and what needs to be done.
  • The Action List and the Action List over Time are better when you want to get a perspective across activities, and also, in the case of the Action List over Time when you want a time based view of events.
  • The Action List over Time is particularly effective when you are working towards a near-term deadline (e.g. 2-3 weeks out) when you are trying to work with the team to ensure that everything gets done in time.
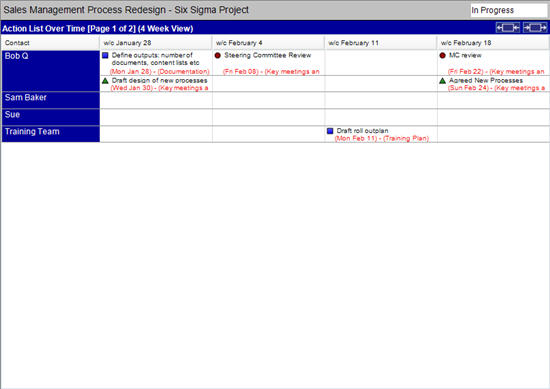
  • Both the Action List and the Action List over Time can be sorted by Activity Group and also by Contact so you can quickly review all the tasks that an individual may be responsible for even when they are spread across multiple activities.


Sharing the plan with others

If someone has Swiftlight installed on their computer, then you can share the project file with them in exactly the same way that you can share a Microsoft Word or Excel file with other people who also have MS Office. You can either send them the Swiftlight file directly, or save it on a shared server or in collaborative environments such as E-room or SharePoint where other people can access the file.

If someone does not have Swiftlight, then you can share all or part of the plan with them in a variety of ways:

  • By exporting the relevant views (or outputs) to PowerPoint or PDF files and sending these to them;
  • By exporting lists or tables to Excel (CSV);
  • By selecting one or more rows in lists or tables, and copy/pasting them into Outlook, Word, Excel, PowerPoint et al


More ways to use Swiftlight in the Project Lifecycle:


The big picture

The big picture

The Big Picture


What is “the big picture”? It can mean many things, but in a project a key element of “big picture thinking” is having a clear and specific idea about where you are headed and clarity about how you are going to get there. Swiftlight provides three views which can help you with this:


The Objectives and Scope view

:
This provides a series of pages in which to display information related to the project’s scope. Seven categories of information can be displayed:

  • Objectives;
  • Key Questions (i.e. questions or issues the project needs to address);
  • Deliverables;
  • Success Metrics;
  • Budget;
  • Scope In / Scope Out;
  • Comments.

The Timeline view

:
This is an intuitive and highly configurable view that allows you to set out or review high level project plans and get a "big picture view" of what needs to get done quickly and simply. For many projects, it can give you a great "one page plan", for others it may be that you need two pages or more

The Activity Group Summary

This view provides a summary table of information about the Activity Groups. This information can include Activity Group objectives, deliverables; success metrics etc (see Getting Familiar with Each View for more details), and can also display information on the project objectives, deliverables etc in the header section (taking information from the Objectives and Scope View).


How to use these views?

These views can be used alone or in combination to help you and others think through and define a high level plan, and then give you the right set of materials for a variety of occasions (e.g. for a project charter document or project proposal, for use in a kick-off or review meeting, or simply for use by you or your team). For example:

  • For many projects, the timeline in standard mode gives you a great “one page plan” and you won’t need the other views.
  • For a more formal project charter, you may want to use the Timeline view along with one or more pages from the Objectives and Scope view.
  • For a project proposal, you may add in the Activity Group Summary to create clarity about what the individual activities will deliver and contribute to the overall project.
  • For a kick-off meeting, you may use the Objectives and Scope view to discuss the project direction, the Timeline to discuss “how you are going to get there” and the Activity Summary to focus the team on the specific deliverables from the key activities.
  • For a project review meeting you may use the Timeline in review mode to illustrate where you are relative to your baseline plan, and the Activity Group Summary to communicate progress and next steps relative to the key activities.

Note: once you have set up the high level plan to your satisfaction, we recommend setting a project baseline (use the menus: Reporting > Set baseline dates > All items) against which you can subsequently review progress.

All of these “big picture” views help you summarise and communicate what you want to achieve and/or where you are at a high level – creating the clarity which will help you, and the others who are involved, to drive the project forward.


More ways to use Swiftlight in the Project Lifecycle


Using Swiftlight in Project Management

Using Swiftlight in Project Management

Using Swiftlight in Project Management


Swiftlight is designed to bring ease and clarity to the planning, communication and implementation of projects and initiatives. It supports the fundamentals of project management through its unique and powerful structure and through a range of features which will help you drive a project from initiation right through to completion.

The structure enables a focus on objectives, deliverables and success metrics, both for the project (in the Objectives and Scope View and in page headers) and for key activities (in the Activity Group Detail, Activity Group Summary and Timeline Interlaced views), thereby encouraging the output focused mindset which is a key driver of success.

The combination of the Objectives and Scope View and the Timeline also allows you to capture information on the four classic project constraints:

  1. Scope – through your articulation of objectives, key questions, deliverables, what’s in/out of scope etc in the Objectives and Scope view;
  2. Quality – through your definition of success metrics in the Objectives and Scope view;
  3. Time – through the Timeline view;
  4. Resource – though summarising the budget in the Objectives and Scope view.

The structure and outputs also operate at two levels:

Big picture level:
Some views / outputs are designed to give you and others a high level perspective on the project (e.g. the Timeline, Objectives and Scope and Activity Group Summary views);

Detail level:
Other views / outputs are designed to help you and others focus on who has to do what by when – either simply the next action or the full detail of what needs to get done throughout the project – helping you drive the specific actions to move the project forward.


Swiftlight also supports and facilitates all stages of a project’s lifecycle, with views / outputs that are well suited to different stages of a project and to different occasions / audiences, as illustrated below:


Further, the professional quality of Swiftlight’s outputs, and their clarity, facilitate the communication which is so central to success, and help save you time since you have your plan and communication materials all in one place.

The strong underlying project management framework and the flexibility provided by the different tools / outputs, focuses you and your team on the right things and frees you to work in a way that suits your style of thinking and/or the specific needs of your current project.

The following sections will help you explore how to use Swiftlight to save time and drive for success in your projects:


Swiftlight in the Project Lifecycle


Creating a Template

Creating a Template

Creating a Template


Some users like to have a "project template" (with their chosen colours, terminology etc), and then to start all new files from this template. This can be very helpful when, for example, all outputs need to comply with branding guidelines, and where therefore it is easier to make the right colour and font selections once, rather than doing it for each file.


To create a customised template in Swiftlight, follow the steps below:

  • Open a new Swiftlight file;
  • Using the Tools Options Dialogue, make all your desired changes to terminology, colours, font, icons, logo and the PowerPoint template to which outputs from the file will be exported;
  • Save the file as, for example, "CompanyTemplate" in a convenient, easy-to-find folder.


To use this template:

  • When you start work on a new project, find and open the "CompanyTemplate" file;
  • Using "Save As", save the file with a new name and get started.


Note: to ensure that the dates ranges in your new file are current and reflect the desired date range of your project you should:

  • Update the date range of the Timeline, using the short cut buttons or the Date Range tab of the Page Body Format Dialogue. (NB The template file will likely have dates that are in the past, depending on when and how it was saved).
  • Update the date range of the Action List over Time to align it with the Timeline. Go to the Action List over Time view and use the Import Button on the Date Range tab of its Page Body Format Dialogue.