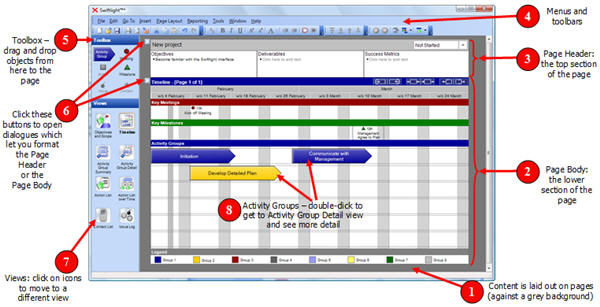
Data entry is highly intuitive. For areas of text you can click and type (for example in the page header) to add content. To add other objects, such as Meetings or Activity Groups, you can simply drag and drop them onto the page from the toolbox (alternatively you can use the right click menu > add … ).
To edit items either click on the text, or select the object and move it, or use the right click or main menus. Double clicking on items will show more detail on that item, if it is available. Editing something in one view of the application automatically updates it everywhere else (e.g. if you change the name of a milestone in the timeline, it automatically updates itself in the Action List, Activity Group Detail, and Action List over Time).
As you add or edit data on each view, a Dynamic Formatting Algorithm (patent pending) automatically sizes and formats the content, within certain constraints, to optimize its display on the page. For example, you can insert a new row for Activity Groups in the timeline, and the other rows will shrink to allow space for it, provided this can be achieved within the constraints. This allows you to think about and create / edit your plan without having to worry about the difficulties of formatting it and making it look good.
In order to fine tune the automatic formatting, you can access and edit the pre-set constraints which affect both sizing (i.e. height and width of objects) as well as formatting (i.e. what gets displayed, font sizes etc), through the Page Layout menu, the Page Format dialogues, as well as with the toolbar.
For more information on the other views why not check out the following help topics to help you to get started using Swiftlight for your projects and initiatives:
If you can’t see what you are looking for here, please see the Help Menu topics for more ways to get help with Swiftlight.