Introduction
Exporting an extract from Swiftlight file to PowerPoint or to a PDF file enables you to put the outputs of your plan directly into presentations and documents and also provides one way to share your outputs with people who don’t have Swiftlight.
The approach to export makes it easy for you to export what you want since you can choose to export all, or some, of the pages in each view, or to export pages from multiple views. You can also choose the order in which you want to have your pages exported.
Further, with Swiftlight’s "what you see is what you get" (WYSIWYG) design, you always know what you are going to get since each page exports exactly as you see it on your screen.
PowerPoint Templates
By default, exported outputs will appear in a generic PowerPoint template with a white background, a blue line below the title section, no page footer information and with Arial font. However, you can export to your own template by using the PowerPoint Template tab of the Tools Options Dialogue to select a custom template. You can use this dialogue to change the default template for all files or just to select a template for an individual file.
How to Export
The simplest way to get an extract from your Swiftlight file is to use the Export to PowerPoint button on the toolbar (or right-click menu > Export). The resulting extract will contain just be the current view. You will be prompted to provide a filename for your new PowerPoint file and process is then complete.
To export a larger extract from your Swiftlight file, follow these three steps:
On selecting File > Export Extract, the dialogue below will appear. This dialogue gives you great flexibility in choosing which pages to export from your file and how to export them. There are three sections to this dialogue: Page Selection, Output Quality and Page Footer.
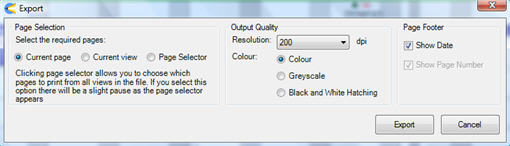
In the “Page Selection” section of the dialogue, you have three options:
In the “Output Quality” section of the dialogue:
In the page footer section, use the tick boxes to select whether you want the current date and a page number to appear at the bottom of the exported pages.
:
When you click the Page Selector button, another section of the dialogue will open up and, after a short pause, the dialogue will appear as illustrated below. (Note: the pages that appear in the page selector area of the dialogue will depend on the view you are in. By default, the pages from your current view and the Timeline are selected to appear when you initially open it up).
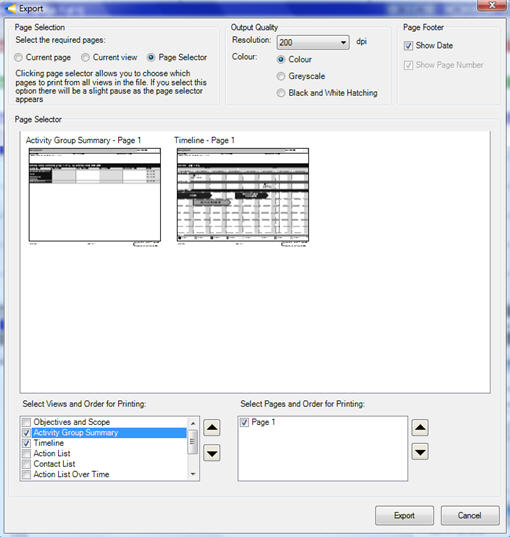
The two boxes at the bottom of this expanded dialogue allow you to select which views you want to export, the order you want to export them in, and the order for individual pages within each view.
In the "Select Views and Order for Printing" section:
Use the tick boxes to select / de-select a view. If a view is selected, its pages will appear in the page selector section in the middle of the dialogue, and in the right hand "Select Pages and Order for Printing" section. Click on the up / down arrows to change the position of the selected view in the order of views and change where this view will appear in the overall export order.
In the "Select Pages and Order for Printing" section:
Use the tick boxes to select / de-select a page. Select a page and then click on the up / down arrows to change the position of this page within the export order.
When you happy with your selections, click on the "Export" button at the bottom right of the dialogue, and then the dialogue below will appear:
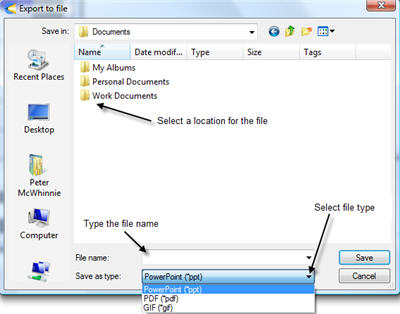
Select the location for your file in your folders, give the file a name, select a file type (PowerPoint, PDF or GIF), and then select “Save”. Swiftlight will then export the pages you have selected to the file type and name of your choice.
Note: The highly graphical nature of Swiftlight means that individual pages use a reasonable amount of memory. If you are selecting a lot of pages for export a) there can be a pause as Swiftlight fills out the page selector, and b) when you actually export, it can take some time for the pages to be processed and exported. Generally, it takes around 5 seconds to process each page (at 200dpi), though this will depend on the specification of your computer. A progress dialogue lets you monitor the progress of the export.